52nd (East Lancashire) Light Anti-Aircraft Regiment, Royal Artillery
| 52nd (East Lancashire) LAA Regiment, RA 293 (East Lancashire) LAA Regiment, RA | |
|---|---|
 Cap badge of the Royal Artillery | |
| Active | 28 November 1938 – 10 March 1955 |
| Country | |
| Branch | |
| Role | Anti-Aircraft Artillery |
| Size | 3 Batteries |
| Part of | British Expeditionary Force W Force Eighth Army X Corps 70 Anti-Aircraft Brigade |
| Garrison/HQ | Burnley |
| Engagements | Battle of France German invasion of Greece Battle of Crete North African campaign Operation Avalanche Italian Campaign |
The 52nd (East Lancashire) Light Anti-Aircraft Regiment, (52nd (EL) LAA Rgt) was a Royal Artillery (RA) air defence unit of Britain's part-time Territorial Army (TA) converted from a field artillery unit just before the outbreak of World War II. It served in the Battle of France, shooting down a large number of aircraft before being evacuated from Dunkirk. It was then sent to the Mediterranean, where detached batteries were destroyed in the fighting in Greece and Crete. The reformed regiment then took part in the defence of the Suez Canal and later in the Italian Campaign. It continued in the postwar TA until 1955 when it merged with other units in Lancashire.
Origin[edit]
During the 1930s the increasing need for anti-aircraft (AA) defence was addressed by converting a number of existing TA units to the AA role. One unit chosen for conversion was the 93rd (East Lancashire) Field Brigade, Royal Artillery, based at Burnley and commanded by Lieutenant-Colonel C.H. Mather. After conversion into a Light Anti-Aircraft (LAA) regiment on 28 November 1938 it had the following organisation:[1][2][3][4]
52nd (East Lancashire) LAA Regiment
- Regimental HQ (RHQ) at Burnley Barracks
- 154 (East Lancashire) LAA Battery at Artillery Drill Hall, Church – converted from 201 Field Bty
- 155 (East Lancashire) LAA Battery at Burnley Barracks – converted from 202 Field Bty
- 156 LAA Battery at Clitheroe – newly-formed
At this stage LAA units were armed with Light machine guns (AALMGs), usually old Lewis guns, but the new Bofors 40 mm gun was on order.[5] After the Munich Crisis in 1938, the TA was doubled in size, and in June 1939 the 52nd formed a duplicate unit at Oswaldtwistle, the 56th Light Anti-Aircraft Regiment, which received its 'East Lancashire' subtitle in February 1942.[2][4]
World War II[edit]
Mobilisation[edit]
In February 1939 Britain's AA defences came under the control of a new Anti-Aircraft Command. In June, as the international situation worsened, a partial mobilisation of the TA was begun in a process known as 'couverture', whereby each AA unit did a month's tour of duty in rotation to man selected AA gun and searchlight (S/L) positions. The whole of AA Command was fully mobilised on 24 August ahead of the declaration of war.[6]
The War Office's plan was that the four newly converted TA LAA regiments (51st–54th) would go to France as soon as they could be mobilised, in order to provide AA cover for the British Expeditionary Force (BEF). 52nd (EL) LAA Regiment therefore crossed to France under Lt-Col Mather in November 1939 as corps LAA regiment for I Corps. (The duplicate units like 56th LAA Rgt remained in the UK to continue their training and became entirely independent.) The new LAA regiments were still badly under-equipped for active service: 52nd had 16 Bofors, 40 AALMGs and 7 Vickers 2-pdr Mk VIII pom-poms, with a reduced scale of transport for a mobile role.[7][8][9][10][11]
Battle of France[edit]
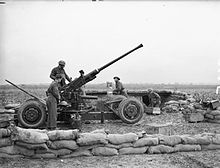
When the German invasion of the Low Countries began on 10 May 1940, the BEF advanced into Belgium under Plan D, and by 15 May 52nd (EL) LAA Rgt was with I Corps on the River Dyle. As a corps LAA regiment its role was to defend bridges, gun areas, HQs and defiles. But the Wehrmacht's breakthrough in the Ardennes threatened the BEF's flank, and it had to retreat again.[12][13][14]
By 18 May 52nd (EL) LAA Rgt was in action round Tournai where it brought down two Dornier Do 17s, two Heinkel He 111s the next day, and one of each on 20 May. On 21 May, at Annappes, 155 LAA Bty under Maj J.S. Baldwin came under shellfire but downed another Dornier, while 156 LAA Bty under Maj E. Howard-Vyse got a Messerschmitt Bf 109 and a Dornier. By now, the regiment was with III Corps and on 22 May the regiment came under the command of 42nd (East Lancashire) Infantry Division, with 155 LAA Bty detached to 'Hammondforce' at St Omer under 2 AA Brigade. On 23 May the regiment got another two Dorniers.[13][15][16][17]
On 26 May the decision was made to evacuate the BEF through Dunkirk (Operation Dynamo). Next day 52nd (EL) LAA Rgt was deployed round Bailleul, where it was credited with the extraordinary number of 14 enemy aircraft shot down. Now the regiment joined 1 AA Bde on the Dunkirk beaches. The AA units covered the shrinking 'pocket' until it was their turn to destroy their equipment and join the queues of men waiting to be taken aboard small boats back to England. During the short campaign 52nd (EL) LAA Rgt was credited with 58 confirmed 'kills', 37 'probables' and many more enemy aircraft damaged.[15][18][19]
AA units returning from France were rapidly reinforced, re-equipped where possible, and redeployed for future integration into existing defence plans. 52nd LAA Rgt, went to the North Midlands where it re-equipped with Bofors guns.[20]
Greece[edit]

Apart from home defence, Britain's strategic focus was on the Mediterranean and Middle East, and after the entry of Italy into the war in June 1940 there was an urgent need to reinforce British forces in the region. A series of convoys began shipping troops (including AA units) on the six-week journey via the Cape of Good Hope and the Red Sea to Egypt. 52nd (EL) LAA Regiment was one of the first units sent.[21][22][23] On 28 October Italy invaded Greece and British troops were sent to help, including 154 LAA Bty, which landed at Piraeus on 6 November and was allocated to defending airfields. Meanwhile 13th LAA Rgt, which had also contributed a battery to Greece, took over 155 LAA Bty in its place and moved up to defend Mersa Matruh on the Egyptian frontier. It advanced to Tobruk after Operation Compass. 155 LAA Battery was then released and sent to Greece in February 1941. Lieutenant-Col Mather went with RHQ and his remaining battery, 156, to join the defences on Crete.[24][25][26][27]
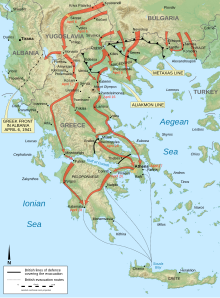
The Greeks having halted the initial Italian invasion, it was widely anticipated that the Germans would carry out a new attack in the Spring. 'W Force' of Commonwealth troops was stretched in a defensive line along the River Aliakmon. 155 LAA Battery was posted to hold the Aliakmon crossings while 154 LAA Bty was deployed as three separate troops around the vital road centre and airfield of Larissa, about 60 miles (97 km) behind the line. The German invasion of Greece came on 6 April, preceded by heavy bombing raids and a flanking attack through Yugoslavia. W Force was soon obliged to abandon the Aliakmon line and carry out a fighting withdrawal. 155 LAA Battery was ordered to detach two troops to Grevena to cover the retirement of an isolated brigade back to Larissa. The battery reached Grevena on 12 April, then spent 5–6 days moving back by stages along rough tracks through narrow ravines, constantly in action. In one defile near Kalabaka the Luftwaffe caught a mass of halted motor and horse-dawn vehicles and caused a catastrophic traffic jam; 155 LAA Bty lost one gun and took 24 hours to cover 8 miles (13 km).[28][29][30][31]
After making a good stand on Mount Olympus, W Force planned to withdraw through Larissa to defend the Pass of Thermopylae. The Luftwaffe attempted to stop this with three days of air raids on Larissa and the airfields. After the airfields had been abandoned, 154 LAA Bty was withdrawn to reinforce Eleusis. The seven remaining guns of 155 LAA Bty finally reached Larissa on 17 April and were immediately sent on to Thermoplyae in 36 hours of continuous driving. After a short rest they were sent another 80 miles (130 km) to join the 2nd New Zealand Division, which was making a fighting retreat down the coast. The battery was attacked while on the move and in the action lost another gun to a premature shell-burst. On arrival the Commander, Royal Artillery (CRA), of 2nd NZ Division deployed the six guns along the division's line of retreat along rough tracks through rugged country. By 24 April these guns had been in action for three days covering the New Zealanders' withdrawal and had exhausted their ammunition. That night the New Zealand rearguard broke contact with the enemy and made its way over the hills to Thebes and Athens, taking 155 LAA Bty with it. On 26 April the battery was ordered to destroy its remaining equipment and make its way south.[32][33][34]
154 LAA Battery and 20 Heavy AA Bty of 2nd HAA Rgt defending the airfields at Menedi and Eleusis were under repeated attack from 18 to 20 April by Bf 109s and Junkers Ju 87 'Stukas'. The HAA could do little against these low-level and divebombing attacks, and several guns were knocked out, but together with 154th LAA Bty 5 enemy aircraft were destroyed before the guns were withdrawn. The bulk of W Force was now making its way to Kalamata to be evacuated and the remaining AA guns were redeployed to Argos to cover the route through Athens and across the Corinth Canal. A troop of 154 LAA Bty helped to defend the airfields at Argos against fierce attack until the last Royal Air Force (RAF) fighters were destroyed, then made its way to the bridge over the Corinth Canal. Here heavy raids began at dawn on 26 April, with the AA positions being singled out. Although the AA guns put up desperate defensive fire they were swamped by several hundred German paratroopers and glider troops landing in and around their defences. The bridge was blown up[a] before the paratroops could seize it but the AA detachments armed with only a few rifles and LMGs were overrun and most were captured. Only about 130 AA gunners, from a variety of units, got away from this battle to be picked up by HMS Orion. All remaining AA gunners in Greece were ordered to destroy their equipment and form anti-paratroop platoons to cover the evacuation from Kamalata. On 28 April the New Zealanders arrived to take over this rearguard role and the gunners were released for evacuation. Four officers and 90 other ranks of 155 LAA Bty eventually made their way out of Greece by this means.[33][37][38]
Crete[edit]
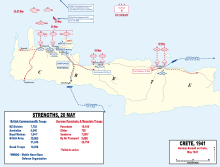
After conquering mainland Greece, the Germans turned their attention to Crete, where RHQ and 156 Bty of 52nd (EL) LAA Rgt had been deployed with 'Creforce' since the previous December. On the eve of the invasion, Lt-Col Mather with RHQ was AA Defence Commander (AADC) of 'M' Group defending the naval installations in the Suda–Canea Sector, consisting of:[39][40][41][42]
- One Trp 151st HAA Bty of 51st (London) HAA Rgt – 6 x 3.7-inch guns
- 129 LAA Bty of 15th (Isle of Man) LAA Rgt – 11 x Bofors
- Section 156 LAA Bty of 52nd (EL) LAA Rgt – 2 x Bofors
- Section 7 Australian LAA Bty – 2 x Bofors
- Gun Operations Room
A few miles away, two troops of 156 LAA Bty under Maj R.S. Kay with 8 Bofors were deployed round Maleme airfield, sited on higher ground to get an all-round field of fire and also to be able to fire onto possible invasion beaches. Meanwhile, another troop of 156 LAA Bty with 5 Bofors was along the coast at Heraklion with 14 Infantry Bde.
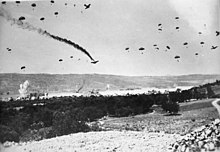
Air attacks on Crete began in March, but became intense on 14 May, and by 19 May the RAF had been virtually driven from the air while shipping losses in Suda Bay harbour were mounting. It was decided to withdraw the remaining fighters and to defend the harbour with an AA concentration over the pier. The effect was dramatic: thereafter not a single bomb hit a ship or the jetty and many aircraft sheered off without attacking, with 156th LAA Bty scoring a number of 'kills'. However, the LAA positions were the target for 'flak suppression' attacks by several aircraft at once. The assault by paratroops and glider troops was launched on 20 May, after another 2-hour air raid in which 156 LAA Bty on its exposed high ground around the airfield suffered severely. The airfield was one of the Germans' principal objectives and the LAA gunners used their Bofors and small arms against low-flying fighter-bombers and then against the transport aircraft and gliders: 156 LAA Bty fired 1500 rounds of Bofors ammunition and scored numerous hits. The gliders and paratroops dropped either side of Maleme in order to capture it by a converging attack, but many fell among the New Zealand defenders and the AA positions and casualties on both sides were considerable. During the day AA guns were moved from Suda Bay to prevent a sea landing at Maleme, then moved back. Two guns were moved to help the New Zealand Division. By the end of the day several guns had been knocked out or overrun and most gunners were fighting as infantry. Major Kay was last seen making his way to a neighbouring Royal Marines AA position. Nevertheless, the Germans had still not secured the airfield: next day it was in No man's land between the two sides. The initial attacks on Heraklion had also been held off: the LAA guns shot down 15 Junkers Ju 52 transports and decimated the descending paratroopers. However, during the afternoon of 21 May the Germans began landing aircraft with reinforcements directly onto Maleme airfield under fire. There was ferocious fighting round the airfield that night, but by dawn the counter-attacks had to be called off in the face of mounting German air superiority. By 24 May Canea was in flames after repeated bombing and the remaining AA guns were being moved about, constantly engaging enemy aircraft. By 26 May the situation was untenable and the remaining troops began withdrawing to the south of the island for evacuation. That night two officers and 20 men of 156 LAA Bty fought their way out of Suda with the New Zealanders after using their Bofors as field guns, and made their way to the coast three days later. Several thousand men were taken off each night, and most of the Heraklion force was successfully evacuated, but thousands were captured on the island or lost when the ships came under air attack. During the battle the inadequate AA defences had shot down 147 Luftwaffe aircraft and damaged many more: the Germans had been close to calling off the operation because of these unsustainable losses.[43][44][45][46]
North Africa[edit]
After their losses in Greece and Crete, 154 and 156 LAA Btys were officially disbanded on 1 July 1941.[4][47][48] RHQ of 52nd (EL) LAA Rgt was reformed in Egypt; at first with only 155 LAA Bty under its command. Later it was joined by 100 LAA Bty, which had been formed in the UK on the outbreak of war and joined the War Office Reserve at the end of February 1941, preparatory to going to Egypt.[49][50] When it joined 52nd (EL) LAA Rgt, 100 LAA Bty's 12 Bofors were deployed along the Suez Canal between Suez and Shallufa, while 155 LAA Bty had 8 Bofors on the canal and a detached 4-gun troop at Alexandria. This extended layout was under the command of 2 AA Bde, charged with defending the canal and ports that were vital to the flow of supplies and reinforcements to the Western Desert campaign. Apart from bombing the ports, Axis aircraft could interdict the canal by dropping Parachute mines. Defending against this was an obvious role for S/Ls and LAA guns, but the numbers required for complete coverage were excessive. The compromise plan involved siting single S/Ls on either side of the canal at 2,200 yards (2,000 m) intervals, with additional rows on the flanks spaced at 5-6000-yard intervals. Thus illumination was restricted to a belt along the length of the canal. Fighter aircraft were to provide the main defence, but the problem of intercepting low-level raids led to the deployment of single Bofors guns spaced at intervals of about 3,500 yards (3,200 m) yards on the banks of the narrow stretches of the canal.[51]
The regiment remained defending these vital communications while the battles of the Western Desert campaign were fought in 1941–42. After the Commonwealth victory at the Second Battle of El Alamein, Eighth Army pursued the defeated Axis forces westwards, and AA units moved up behind it to protect its communications. By January 1943, RHQ of 52nd (EL) LAA Rgt was in 18 AA Bde, which was stretched between Alexandria and Matruh, and covering the Desert Air Force (DAF) landing grounds in between. At this point the regiment had 44 Bty of 61st LAA Rgt (12 x Bofors) and 195 Bty of 65th LAA Rgt (18 x Bofors) under command, while 100/52 LAA Bty was still back in the Canal Zone between Suez, Port Said and Cairo, under 11 (Royal Marines) S/L Rgt. 65th LAA Regiment had been formed in the UK in November 1940 with 194, 195 and 196 LAA Btys. The regiment arrived in Malta with 194 and 196 LAA Btys in January 1942, but it appears that 195 LAA Bty went direct to Egypt, where it eventually came under 52nd (EL) LAA Rgt. At this time LAA btys were in the process of converting to the new establishment of 18 x Bofors per battery (ie three 6-gun troops).[52][53][54][55][56]
When the Allied completed their victory in Tunisia in May 1943, ending the North African campaign, 52nd (EL) LAA Rgt had 100 Bty with 17 AA Bde at Tobruk and Gambut, and 195 Bty with 18 AA Bde in the area of Alexandria and the Nile Delta.[57] The Allies then took Sicily and prepared to invade mainland Italy.
Operation Avalanche[edit]
Lieutenant-Col Patrick Dayrell-Browning took command of the regiment in July.[58] The regiment was assigned to 12 AA Bde under Brigadier Mortimer Wheeler, which was assigned to provide AA cover for X Corps in the Allied landings at Salerno (Operation Avalanche). The brigade's units began concentrating around Tripoli in July 1943, where they underwent intensive training in combined operations. However, 52nd (EL) LAA Rgt was still in the Nile Delta and was therefore not included in the initial landings. X Corps had the task of capturing the Port of Salerno and Montecorvino Airfield, then turning north to capture Naples. The landings on 9 September were difficult, but a beachhead was successfully achieved. The first major hitch occurred when Montecorvino Airfield was not captured in the first rush, and continued to be fought over for the next four days. Even then the beachhead battle raged for days within 3,000 yards (2,700 m) of the shore. When a German armoured counter-thrust broke through the right flank of X Corps during the night of 15/16 September, 12 AA Bde was urgently called upon to help out. Wheeler went down to the beach where 52nd (EL) LAA and 9th (Londonderry) HAA Rgts were landing, and formed a 400-strong infantry force ('Gunnerforce') from them, equipped with rifles and a large number of automatic weapons, under the command of Lt-Col Dayrell-Browning of the 52nd. This group moved up near Montecorvino and deployed along the road and railway. At 03.00 a group from 9th HAA Rgt opened fire on enemy patrols infiltrating along the railway. The situation having been restored, Gunnerforce was relieved the following morning but remained on hand for the next four days as a mobile reserve, attached first to the motorised 1/6th Battalion Queen's Regiment and then to 5th Royal Tank Regiment.[59][60][61][62]
On 17 September the brigade sent 195/52 LAA Bty to protect landing beaches at Maiori where 23 Armoured Bde was making a 'left hook' round the Sorrento Peninsula. The battle for the Salerno beachhead went on for 10 days before the Germans began to withdraw slowly to a position north of the River Volturno.[59][61][63] According to the RA regimental history, 'the regiments of 12th AA Brigade were, by now, raring to go on the long-planned move to Naples. Brigadier Wheeler, indeed, prepared a scheme to break out with a column of AA troops along the coast to Pompeii', but the bold plan was vetoed by X Corps.[64] On 26 September 12 AA Bde was relieved at Salerno by US troops and left for Naples. 195 LAA Battery went over the Maiori Pass with 23 Armoured Bde, suffering 11 wounded and a number of damaged vehicles from mortar fire, while RHQ and the other two batteries of the regiment reached Naples on 2 October (the day after its capture) despite traffic congestion.[59][60][61]
Naples to Rimini[edit]
By 5 October the brigade's units were deployed around the Bay of Naples, finding considerable difficulty in establishing communications and suitable gun sites, some of which had to be bulldozed. However, it only experienced one serious air raid, which was driven off with little damage. 12 AA Brigade then moved forwards to rejoin X Corps. X Corps began crossing the Volturno on 12 October, with LAA guns being used to sweep the crossing points. The Luftwaffe was very active in trying to prevent the crossing, particularly using Bf 109s and Focke-Wulf Fw 190s as fighter-bombers. The LAA guns were then employed to guard the bridges, including the one at Capua. On 23 October another air raid on Naples developed, with a number of bombers taking evasive action over Capua, where some were destroyed by 12 AA Bde's guns.[59][60][61]
12 AA Brigade then had a stable period as the Allies faced the German Winter Line. Its tasks for X Corps included providing AA cover for vulnerable points (VPs) such as routes, bridges, landing grounds, field gun positions and the Aversa railway yards. To defend these VPs at night the brigade used controlled LAA barrages with a high density of guns (LAA guns were normally used in daylight). These were either directional, fired along pre-arranged bearings, or box barrages (named 'Porcupine's).[60][61][65][66] Having already served so long with 52nd (EL) LAA Rgt, 195 LAA Bty officially transferred to it from 65th LAA Rgt on 27 October 1943.[4]
In January 1944 12 AA Bde moved forward to cover the assembly areas and ferry sites for X Corps' crossing of the Garigliano, the preliminary phase of the Battle of Monte Cassino. The crossing, on the night of 17/18 January, was successful and the engineers began building bridges. However, the follow-up crossings upstream on 19/20 January failed, and the operations against Monte Cassino descended into stalemate by mid-February. Meanwhile, X Corps' attempts to expand its bridgehead came under counter-attack and 12 AA Bde's LAA regiments had to defend the Garigliano bridges against Luftwaffe fighter-bomber attacks. Because the HAA regiments were largely engaged in ground fire, their gun-laying radar sets could be used to supplement the single local-warning radar set and pick up the approach of raids using cloud cover before diving to low level.[60][66][67][68]
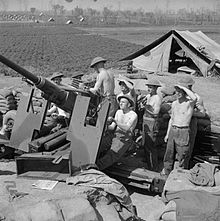
During March and April 1944 12 AA Bde was regrouped for the final assault on Monte Monte Cassino, supporting X and XIII Corps. The LAA positions along the Garigliano front were under direct enemy observation and had to be screened by smoke. Communications in the mountainous area were difficult, and on X Corps' front the HAA batteries were strung out in a line with gun positions about 5 miles (8.0 km) apart and LAA gunners helped their colleagues by carrying supplies up to these positions at night and under mortar fire. The renewed attack on Cassino began on the night of 11/12 May. 12 AA Brigade's LAA regiments were committed to bridges, defiles, assembly areas and artillery positions, and enemy aircraft were active in low-level strafing and bombing. There were severe problems in getting the AA guns forward along the heavily congested routes. After the capture of Rome in early June, the Germans pulled back to the Gothic Line.[60][66][69]
Although it carried out a number of raids, the gravely weakened Luftwaffe was unable to influence any of these operations. Meanwhile, British forces in Italy were suffering an acute manpower shortage. In June 1944 the Chiefs of Staff decided that the number of AA regiments in Italy must be reduced – LAA regiments were reduced from 54 to 36 guns – their surplus personnel being converted to other roles, particularly infantry.[60][70][71][72][73]
After the capture of Rome, 12 AA Bde guarded airfields and river crossings in the Tiber Valley.[66][68][74] In August, 12 AA Bde and its units were transferred to Eighth Army on the Adriatic front, supporting the advance on Rimini. Over the next six months the army advanced only 100 miles (160 km), finally reaching the main Gothic Line positions. During this period the brigade mainly supported II Polish Corps. AA units were hampered by lack of early warning radar, while enemy aircraft were initially very active. LAA fire was severely restricted at night to prevent 'friendly fire' incidents. However, Luftwaffe activity declined towards the end of the year, and LAA gunners were sometimes employed on other tasks, such as helping the engineers to launch Bailey bridges near Rimini.[60][66][68]
Spring Offensive[edit]
52nd LAA Regiment remained with 12 AA Bde in Eighth Army during the final months of the war. By January 1945 the brigade's units were spread thinly to defend a large number of roads, ports and railheads for Eighth Army and landing grounds for the DAF. Luftwaffe intrusions were rare, but from April were increasingly made by jet aircraft which were difficult AA targets.[60][66][68]
Eighth Army now prepared for its Spring offensive Operation Grapeshot. Attacks by the Luftwaffe were now rare, and the AA guns were primarily used for ground firing, the Bofors proving useful in hitting pinpoint targets. This became so popular with the ground forces that at one time or another all of 52nd LAA guns were deployed in this way with the frontline divisions across V Corps' front. The targets given to them included enemy mortar and sniper positions, road junctions and buildings, or working parties. One troop supported 56th (London) Division in a preliminary attack across the River Reno on the night of 5/6 April, and then fired the starting signal for the whole offensive on 9 April. The guns were also used to mark the artillery barrages and their lifts with Tracer ammunition for the infantry following them. This meant that the Bofors guns had to be sited well forward on the river banks – and they remained in these positions when the rest of the troops with withdrawn for safety during the opening heavy bomber programme, meaning that they were the most advanced troops in the sector. (The HAA guns fired lines of bursts to guide the bombers onto the correct targets.) Once the breakthrough had been achieved and the fighting became fluid, the short range of the Bofors precluded its use for ground fire. However, they were still used for marking barrages and boundaries with tracer. The gun positions came under shell and mortar fire, but this was thought to be general rather than aimed at specific guns. The LAA units were left behind once V Corps was through the Argenta Gap (19 April).[60][66][75]
On 22 April 12 AA Bde was given the responsibility for protecting the pontoon bridge built across the River Po. It then handed this over and advanced as far as Ferrara where it was ordered to stand down on 1 May; hostilities on the Italian front ended with the Surrender of Caserta the following day. Immediately, the brigade formed a transport column to bring up supplies for the army and to collect Prisoners of War (PoWs). From 11 May this was based at Padua. The AA units settled down to traffic control and guarding installations and PoWs while awaiting demobilisation.[60][66][76]
52nd (East Lancashire) LAA Regiment with 100, 155 (East Lancs) and 195 LAA Btys entered suspended animation on 7 November 1945.[4]
Postwar[edit]

The TA was reconstituted on 1 January 1947, and the regiment was reformed as 293 (East Lancashire) LAA Rgt at Burnley in 70 Anti-Aircraft Brigade of AA Command.[2][4][77][78][79][80][81]
AA Command was disbanded on 10 March 1955 and there were wholesale mergers amongst its units. Together with 556 (East Lancashire) Heavy AA Rgt (descended from its duplicate 56th (EL) LAA Rgt) 293 (EL) LAA Rgt was merged into 380 (King's Own) Light Regiment (a light field regiment rather than AA), forming P (Church) and Q (Burnley) Btys. When there were further reductions in the TA on 1 May 1961, the King's Own part of the regiment reverted to infantry in the King's Own Royal Regiment (Lancaster), while the two former East Lancs Artillery batteries, P and Q, amalgamated into 288 (2nd West Lancashire) LAA Rgt as Q (East Lancashire) Bty. However, when the TA was reduced into the Territorial and Army Volunteer Reserve (TAVR) in 1967, this regiment also became part of the King's Own, ending the artillery lineage.[2][78][80][82][83]
Footnotes[edit]
Notes[edit]
- ^ Monthly Army List, various dates.
- ^ a b c d Litchfield, pp. 115–6.
- ^ Frederick, p. 524.
- ^ a b c d e f Frederick, pp. 802, 828–9.
- ^ Routledge, pp. 52–5.
- ^ Routledge, pp. 65–6, 371.
- ^ Ellis, France and Flanders, Appendix I.
- ^ Farndale, Annex A.
- ^ Joslen, p. 462.
- ^ Routledge, pp. 113 & 373.
- ^ Routledge, Table XVII, p. 125.
- ^ Ellis, France & Flanders, Chapter III.
- ^ a b Ellis, France & Flanders, Chapter IV.
- ^ Routledge, pp. 115–7; Table XVIII, p. 126.
- ^ a b Farndale, p. 63.
- ^ Routledge, pp. 117–8.
- ^ 2 AA Bde War Diary, France 1940, The National Archives (TNA), Kew, file WO 167/427.
- ^ Ellis, France & Flanders, Chapter XI.
- ^ Routledge, pp. 118–22.
- ^ Farndale, p. 98.
- ^ Farndale, pp. 117–9.
- ^ Playfair, Vol I, pp. 190–2, 244–5.
- ^ Routledge, pp. 127–8.
- ^ Farndale, pp. 129–30, 180.
- ^ Joslen, pp. 478, 481.
- ^ Playfair, Vol I, pp. 226–9.
- ^ Routledge, pp. 128–30, 144; Table XIX, p. 141.
- ^ Playfair, Vol I, pp. 333–7, 377–81, 385–6.
- ^ Playfair, Vol II, pp. 70, 83–90.
- ^ Routledge, pp. 144–6.
- ^ US Army CMH, Balkans, pp. 80, 96.
- ^ Playfair, Vol II, pp. 90–100.
- ^ a b c Routledge, pp. 146–7.
- ^ US Army CMH, Balkans, pp. 96–107.
- ^ Playfair, Vol II, p. 103.
- ^ US Army CMH, Balkans, p. 107.
- ^ Playfair, Vol II, pp. 93–104.
- ^ US Army CMH, Balkans, pp. 107–111.
- ^ Farndale, pp. 180–1.
- ^ Joslen, p. 481.
- ^ Playfair, Vol II, pp. 121–5.
- ^ Routledge, p. 149.
- ^ Farndale, pp 177–85.
- ^ Playfair, Vol II, pp. 131–5, 140–4.
- ^ Routledge, pp. 129, 147–52.
- ^ US Army CMH, Balkans, pp. 119–41.
- ^ Routledge, p. 152.
- ^ GHQ Middle East, 'Disbandment of Units', 28 June 1941; copy in 580th (Lancashire) Army Troops Company, Royal Engineers, War Diary 1941, TNA file WO 169/1914.
- ^ Frederick, p. 801.
- ^ Order of Battle of the Field Force in the United Kingdom, Part 3: Royal Artillery, 26 December 1940, with amendments, TNA files WO 212/4 and WO 33/2365.
- ^ Routledge, pp 134–5; Table XXII, p. 143.
- ^ Frederick, pp. 802, 830.
- ^ Joslen, pp. 484–5.
- ^ Rollo, Appendix A.
- ^ Routledge, Table XXIV, pp. 162–3.
- ^ Routledge, Table XXVII, p. 174; Table XXIX, p. 175.
- ^ Routledge, Table XXV, p. 164.
- ^ Imperial War Museum catalogue entry for Brig P.R. Dayrell-Browning papers.
- ^ a b c d Routledge, pp. 271–4.
- ^ a b c d e f g h i j k 'History of 12 AA Brigade', TNA file WO 204/7254.
- ^ a b c d e Brig Mortimer Wheeler, '12 AA Brigade, Report on Operations 1 May 43 to 1 Nov 43: The Salerno Landings and the Advance to the Volturno', TNA file WO 204/7254.
- ^ Doherty, pp. 131–2.
- ^ Molony, Vol V, pp. 289–90.
- ^ Routledge, pp. 273–4.
- ^ Molony, Vol V, pp. 443–4.
- ^ a b c d e f g h Routledge, pp. 283–4.
- ^ Molony, Vol V, pp. 606–12, 614–20, 622–36.
- ^ a b c d Routledge, Table XLVII, pp. 296–7.
- ^ Molony, Vol VI, Pt I, pp, 76–84, 115–26.
- ^ Molony, Vol V, pp. 421–3.
- ^ Molony, Vol VI, Pt I, pp. 448–50.
- ^ Jackson, Vol VI, Pt II, pp. 137–8.
- ^ Routledge, pp. 278.
- ^ Routledge, Table XLIV, p. 293.
- ^ Jackson, Vol VI, Pt III, pp. 215–28, 259–60, 262–73; Map 16.
- ^ Jackson, Vol VI, Pt III, pp. 315–28.
- ^ Farndale, Annex M.
- ^ a b Frederick, pp. 1002, 1008–9, 1022.
- ^ Litchfield, Appendix 5.
- ^ a b 289–302 Rgts RA at British Army 1945 onwards.
- ^ Watson, TA 1947.
- ^ 520–563 Rgts RA at British Army 1945 onwards.
- ^ 372–413 Rgts RA at British Army 1945 onwards.
References[edit]
- Richard Doherty, Wall of Steel: The History of 9th (Londonderry) Heavy Anti-Aircraft Regiment, Royal Artillery (Supplementary Reserve), Limavady, Co Londonderry: North-West Books, 1988, ISBN 0-907528-13-9.
- Maj L.F. Ellis, History of the Second World War, United Kingdom Military Series: The War in France and Flanders 1939–1940, London: HM Stationery Office, 1954/Uckfield: Naval & Military, 2004, 978-1-85457-056-6.
- Gen Sir Martin Farndale, History of the Royal Regiment of Artillery: The Years of Defeat: Europe and North Africa, 1939–1941, Woolwich: Royal Artillery Institution, 1988/London: Brasseys, 1996, ISBN 1-85753-080-2.
- J.B.M. Frederick, Lineage Book of British Land Forces 1660–1978, Vol II, Wakefield: Microform Academic, 1984, ISBN 1-85117-009-X.
- Gen Sir William Jackson, History of the Second World War, United Kingdom Military Series: The Mediterranean and Middle East, Vol VI: Victory in the Mediterranean, Part I|I: November 1944 to May 1945, London: HM Stationery Office, 1988/Uckfield, Naval & Military Press, 2004, ISBN 1-845740-72-6.
- Lt-Col H.F. Joslen, Orders of Battle, United Kingdom and Colonial Formations and Units in the Second World War, 1939–1945, London: HM Stationery Office, 1960/Uckfield: Naval & Military Press, 2003, ISBN 1-843424-74-6.
- Norman E.H. Litchfield, The Territorial Artillery 1908–1988 (Their Lineage, Uniforms and Badges), Nottingham: Sherwood Press, 1992, ISBN 0-9508205-2-0.
- Brig C.J.C. Molony, History of the Second World War, United Kingdom Military Series: The Mediterranean and Middle East, Vol VI: Victory in the Mediterranean, Part I: 1st April to 4th June 1944, London: HM Stationery Office, 1987/Uckfield, Naval & Military Press, 2004, ISBN 1-845740-70-X.
- Maj-Gen I.S.O. Playfair, History of the Second World War, United Kingdom Military Series: The Mediterranean and Middle East, Vol I: The Early Successes against Italy (to May 1941), London: HM Stationery Office, 1954/Uckfield, Naval & Military Press, 2004 ISBN 1-845740-65-3.
- Maj-Gen I.S.O. Playfair, History of the Second World War, United Kingdom Military Series: The Mediterranean and Middle East, Vol II: The Germans come to the aid of their Ally (1941), London: HM Stationery Office, 1956/Uckfield, Naval & Military Press, 2004 ISBN 1-845740-66-1.
- Denis Rollo, The Guns and Gunners of Malta, Valetta: Mondial, 1999, ISBN 99909-68-84-5.
- Brig N.W. Routledge, History of the Royal Regiment of Artillery: Anti-Aircraft Artillery 1914–55, London: Royal Artillery Institution/Brassey's, 1994, ISBN 1-85753-099-3.
- US Army Center of Military History, The German Campaign in the Balkans (Spring 1941), Washington, DC: US Government Printing Office, 1986.
